Develop a USD Explorer App
In the previous section we created a rather simple app from scratch in order to learn basic aspects of Application creation. Building on that knowledge we now continue with a more complex and feature rich Application: a USD Explorer Application. The USD Explorer is an NVIDIA “reference Application”. Its purpose is to demonstrate Omniverse platform capabilities so that developers can quickly get started with creating more advanced solutions. You can read more about the Application here.
Important
The Omniverse USD Explorer Application is composed of many curated Extensions from Kit SDK. These have been been through quality control to ensure they work together in concert with the specific settings of the USD Explorer Application.
In this tutorial, we encourage developers to explore using all Extensions available on the platform; however, it’s imporant to recognize the need to scrutinise any new Application based on the example. Adding existing Extensions, adding new Extensions, and changing settings are all reasons to do careful quality control of the new app if it is to be used for production.
This section covers:
Customizing the Application through settings.
Adding new functionality by creating a new Python Extension.
Hot loading Python code changes in the app.
Adding a menu item to reveal a window.
Connect VSCode to the app for debugging Python code.
Write tests that simulate user interactions.
How to develop Applications for Omniverse Cloud.
Setup a New App
This project provides an omni.usd_explorer.kit file as an example of a feature rich
Application. Let’s duplicate the omni.usd_explorer.kit app and the associated
omni.usd_explorer.setup Extension. You could also just rename the existing files - but duplicating
them allows keeping an original around for reference.
Duplicate Files
Duplicate
.\source\apps\omni.usd_explorer.kit. Name the new filemy_company.usd_explorer.kit.Duplicate directory
.\source\extensions\omni.usd_explorer.setup. Name the new directorymy_company.usd_explorer.setup.Rename the
omnifolder in.\source\extensions\my_company.usd_explorer.setup\tomy_company.Replace
omni.usd_explorer.setupwithin the new files withmy_company.usd_explorer.setup.In VSCode, use
Edit>Replace in Files: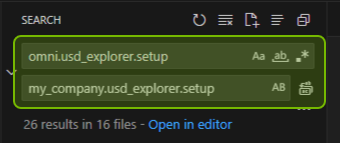
For each entry in
my_company.usd_explorer.kitand entries in themy_company.usd_explorer.setupdirectory use theReplacebutton:
In
.\my_company.usd_explorer.setup\premake5.lua, changerepo_build.prebuild_link { "omni", ext.target_dir.."/omni" }torepo_build.prebuild_link { "my_company", ext.target_dir.."/my_company" }.
Configure
Configure build tool to recognize the new Application.
Open
.\kit-app-template\premake5.lua.Find the section
-- Apps:.Add an entry for the new app:
define_app("my_company.usd_explorer"). Optionally remove the entrydefine_app("omni.usd_explorer").
Build & Verify
Run a build and verify that the new Application works by starting it:
Windows:
.\_build\windows-x86_64\release\my_company.usd_explorer.batLinux:
./_build/linux-x86_64/release/my_company.usd_explorer.sh
Note
The first time the Application launches it could take a while. In the shell, you’ll eventually
see RTX ready - this is when the app is done initializing.
Try running it again and you should note a much faster startup time.
Important
If you accidentally missed a step and the build fails, or if there are errors finding
the my_company.usd_explorer.setup Extension on startup:
Make any necessary changes in
.\source.Remove
_builddirectory with commandbuild -cor delete the directory manually.Run a new build.
Customize App via Settings
We’ve established that the [settings] section of a kit file allows a low code approach to change the behavior of
an Extension. But how do you know what settings are available to begin with? Let’s use the Debug Settings
Extension and do some customizations of the app.
Enable Debug Settings Window
Extensions are free to declare any setting. There is no hardcoded set of named settings. Use the Debug Settings
window to explore what settings are available.
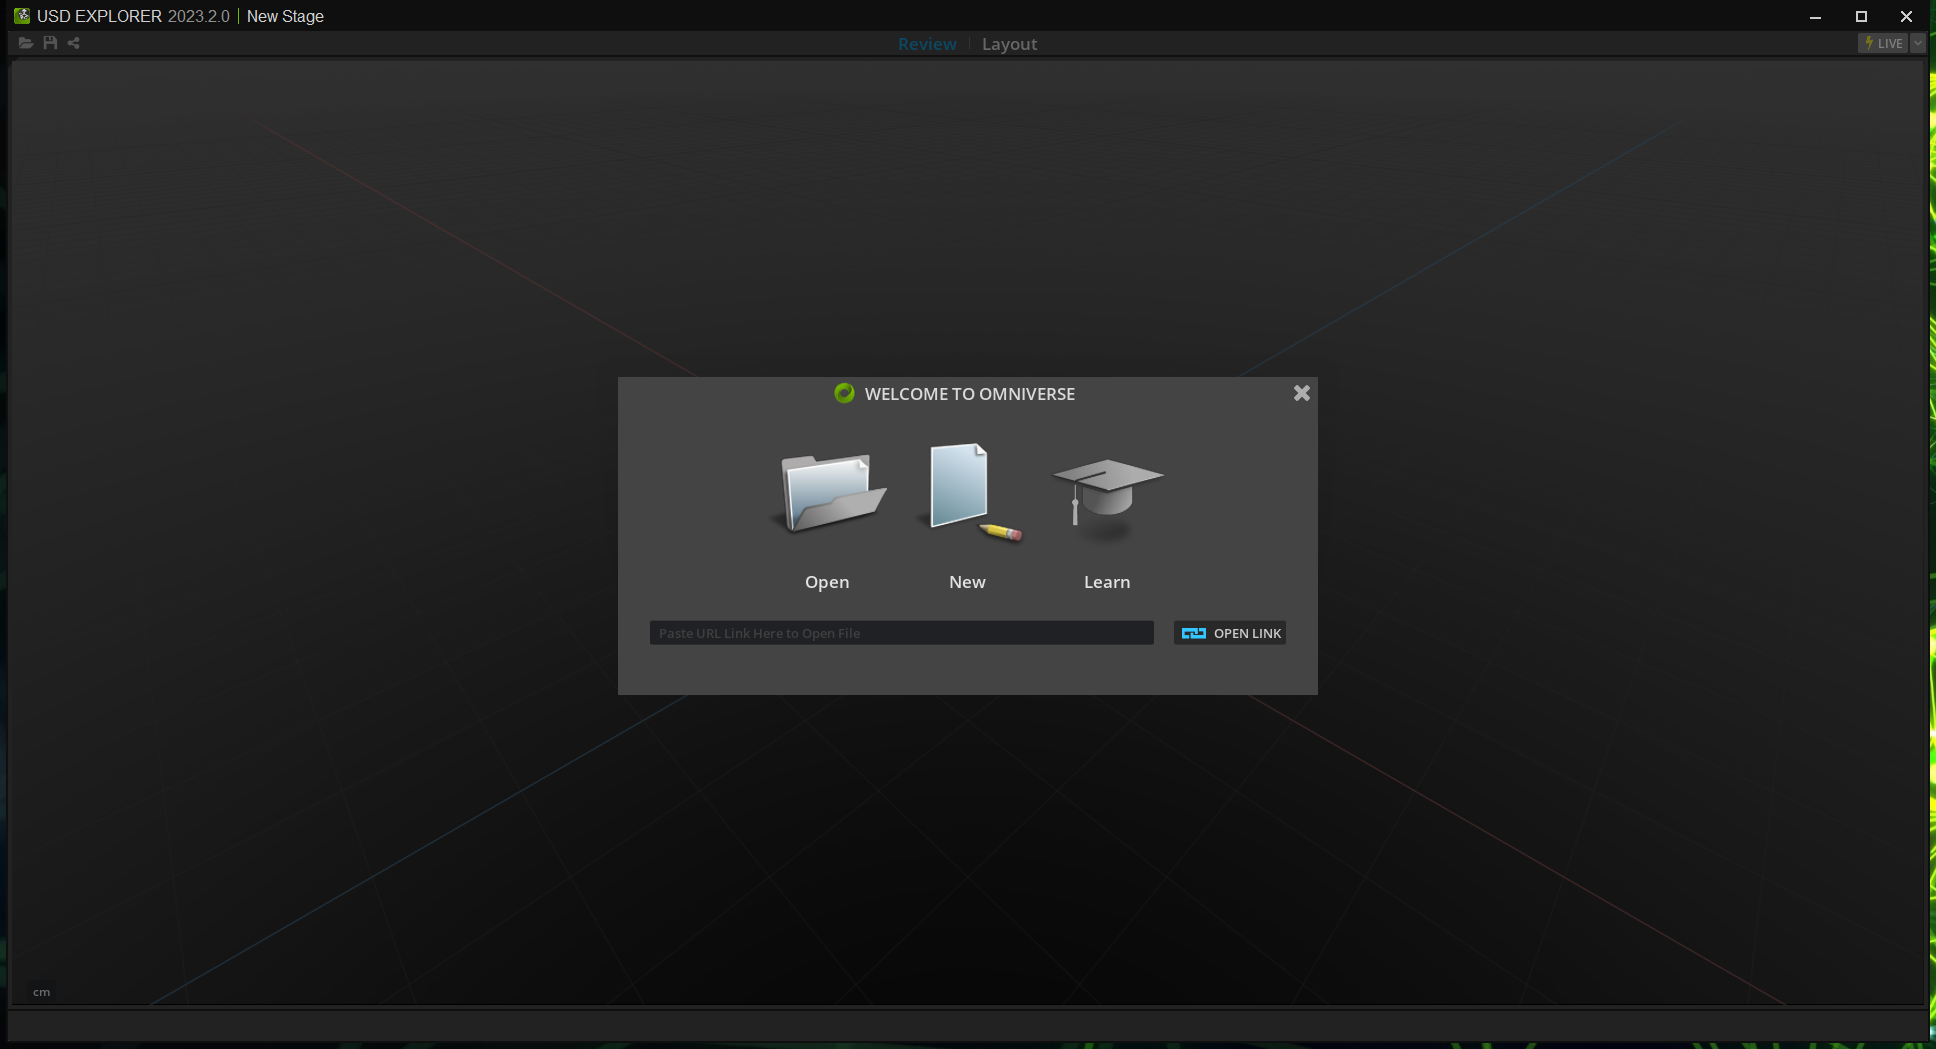
Add dependency "omni.kit.debug.settings" = {} to my_company.usd_explorer.kit. The next time you run the app
the window will appear - just close the WELCOME TO OMNIVERSE window to access it.
Example: Title Bar (Windows only)
The title bar Extension is at this writing a Windows-only feature. It creates a custom title bar for the Application where icon, font styles, title etc can be customized via settings.
Explore Extension Settings
Run the app again.
Close the
WELCOME TO OMNIVERSEwindow.Search for
omni.kit.window.modifier.titlebarwithin theDebug Settingswindow and open theextssection. Now you can explore the various settings for the Extension.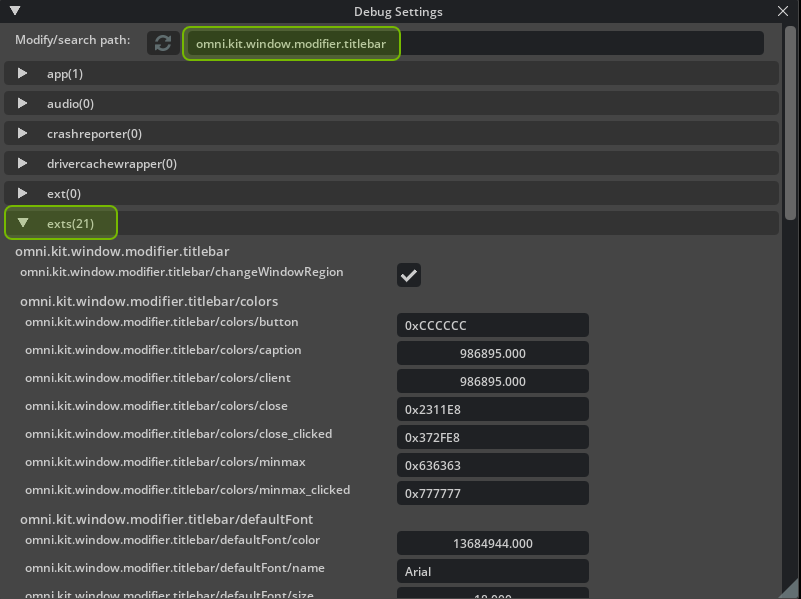
Edit Extension Settings
In
my_company.usd_explorer.kit, search for[settings.exts."omni.kit.window.modifier.titlebar"].
[settings.exts."omni.kit.window.modifier.titlebar"]
titleFormatString = "  USD EXPLORER {verKey:/app/version,font_color=0x909090} {separator} {file, board=true}"
showFileFullPath = true
icon.file = "${my_company.usd_explorer.setup}/data/nvidia-omniverse-usd_explorer.ico"
icon.size = 18
icon.use_size = true
defaultFont.size = 18
defaultFont.color = 0xD0D0D0
...
Now you are able to change for example the title from
USD EXPLORER to MY COMPANY USD EXPLORERwithin thetitleFormatStringsetting.Observe how resources are referenced by the
icon.filesetting:${my_company.usd_explorer.setup}is the root directory of the given Extension and/data/nvidia-omniverse-usd_explorer.icois the file being referenced from within that Extension. Feel free to change that icon but be sure to keep the same resolution. If a path needs to be relative to the app - the.kitfile - then use${app}.Run the app to see changes.
Example: Asset Browser (Windows & Linux)
The Asset Browser Extension presents files from a list of locations - providing end users with intuitive access to content libraries. Customization of the location list can easily be done via a .kit file.
Explore Extension Settings
Run the app again.
Close the
WELCOME TO OMNIVERSEwindow.Search for
omni.kit.browser.assetwithin theDebug Settingswindow and open theextssection to see settings used by the Extension. Here we see that theomni.kit.browser.asset.folderssetting provides a list of locations.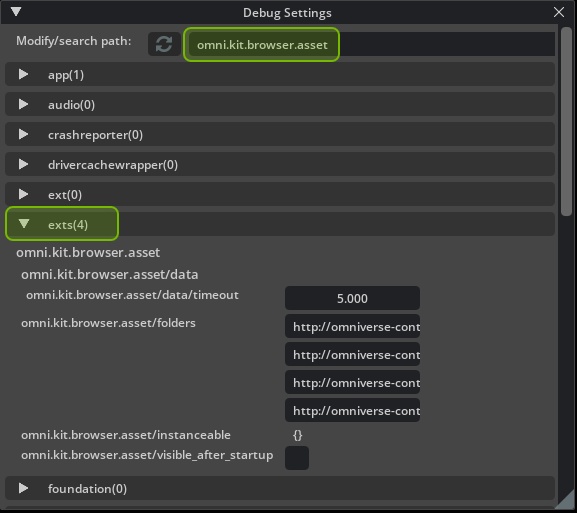
Edit Extension Settings
In my_company.usd_explorer.kit, find the settings line that starts with "omni.kit.browser.asset".folders.
Add a local folder - or some Nucleus directory -
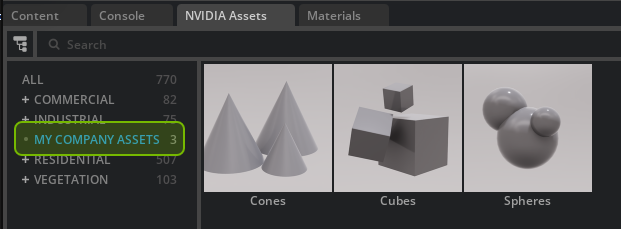
that has some USD files in it - here’s an example adding a My Company Assets directory to the list:
Windows:
"omni.kit.browser.asset".folders = [
       "http://omniverse-content-production.s3-us-west-2.amazonaws.com/Assets/Vegetation",
      "http://omniverse-content-production.s3-us-west-2.amazonaws.com/Assets/ArchVis/Commercial",
      "http://omniverse-content-production.s3-us-west-2.amazonaws.com/Assets/ArchVis/Industrial",
      "http://omniverse-content-production.s3-us-west-2.amazonaws.com/Assets/ArchVis/Residential",
      "C:/My Company Assets",
      ]
Linux:
"omni.kit.browser.asset".folders = [
       "http://omniverse-content-production.s3-us-west-2.amazonaws.com/Assets/Vegetation",
      "http://omniverse-content-production.s3-us-west-2.amazonaws.com/Assets/ArchVis/Commercial",
      "http://omniverse-content-production.s3-us-west-2.amazonaws.com/Assets/ArchVis/Industrial",
      "http://omniverse-content-production.s3-us-west-2.amazonaws.com/Assets/ArchVis/Residential",
      "/home/my_username/My Company Assets",
      ]
Run the app and switch to the
Layoutmode.Select the
NVIDIA Assets browser- the folder you added is now listed on the left.
Observe just how easy it was to change the behavior of the Asset Browser. Keep this in mind when you create Extensions of your own: expose configurable settings where appropriate. Think of the settings as part of the public API of the Extension.
Create an Extension
Adding functionality to Applications - beyond what is available in existing Extensions - is done by creating new Extensions. Here we’ll create a new Extension and use it in the app.
Create a new Extension using
repo template newcommand (command cheat-sheet).For
What do you want to addchooseextension.For
Choose a templatechoosepython-extension-window.Enter name
my_company.usd_explorer.tutorial.Leave version as
0.1.0.The new Extension is created in
.\source\extensions\my_company.usd_explorer.tutorial.
The added Extension has this directory structure:
# Extension root directory
my_company.usd_explorer.tutorial
    config
        # `extension.toml` is the equivalence of an Application .kit file.
        # This is where package metadata, dependencies and settings are managed.
        extension.toml
    # The `data` folder contains resources. At this point it contains some images
    # used to display the Extension in the Extension Manager.
    data
        icon.png
        preview.png
    # The `docs` folder contains both the `CHANGELOG.md` and files for building docs.
    docs
        CHANGELOG.md
        Overview.md
        README.md
    my_company
        usd_explorer
            tutorial
                tests
                    # A sample of Python files for tests.
                    # These are configured to be used only when the Application runs
                    # in `test` mode.
                    __init__.py
                    test_window.py
                # These are the Python modules used by the Application.
                # The directory can have as many files as needed - and subdirectories.
                __init__.py
                python_ext.py
    # `premake5.lua` makes the build process recognize and build the Extension.
    # Without this file nothing inside the my_company.usd_explorer.tutorial directory
    # is included in the build.
    premake5.lua
Let’s add the Extension to the app:
In
my_company.usd_explorer.kit, add"my_company.usd_explorer.tutorial" = {}in the[dependencies]section.Do a build.
Run the app again.
Close the
WELCOME TO OMNIVERSEwindow so theMy Windowcan be seen.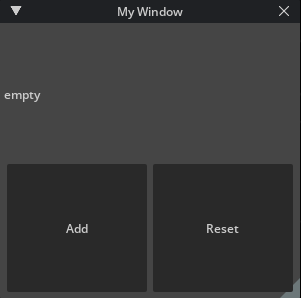
Hot Loading Python Code Changes
If you closed the app, start it up again and make sure the added window is visible.
Open
python_ext.pyfrom.\source\extensions\my_company.usd_explorer.tutorial\my_company\usd_explorer\tutorial.Change one of the button labels; for example, change
ui.Button("Add", clicked_fn=on_click)toui.Button("Increase", clicked_fn=on_click).Save the file and look at what happened to the button in the Application. It was updated.
NOTE: When working with Python Extensions it is possible to leave the Application running when smaller changes are made to the source code. This immediate feedback can be rather useful when making iterative changes.
Debug Code
Let’s use the tutorial Extension to explore how to debug Python Extensions running in an App.
Kit SDK provides omni.kit.debug.vscode that enables Visual Studio Code to attach to a Kit process. Let’s
use this Extension and trigger a breakpoint when using the Add button in our window.
Visual Studio Code Setup
The project includes a .\.vscode\launch.json file which is a configuration for connecting with the debugger. Note the
port number 3000: this is the default port used by omni.kit.debug.vscode.
{
    // Use IntelliSense to learn about possible attributes.
    // Hover to view descriptions of existing attributes.
    // For more information, visit: https://go.microsoft.com/fwlink/?linkid=830387
    "version": "0.2.0",
    "configurations": [
        {
            "name": "Python: Remote Attach",
            "type": "python",
            "request": "attach",
            "connect": {
                "host": "localhost",
                "port": 3000
            },
            "pathMappings": [
                {
                    "localRoot": "${workspaceFolder}",
                    "remoteRoot": "${workspaceFolder}"
                }
            ],
            "justMyCode": true,
            "subProcess": true,
            "runtimeArgs" : [
                "--preserve-symlinks",
                "--preserve-symlinks-main"
            ]
        }
    ]
}
Application Setup
Add "omni.kit.debug.vscode" = {} to the dependencies section of the my_company.usd_explorer.kit.
Attach & Debug
Run the
my_company.usd_explorerapp.Note the
VS Code Linkwindow.
Return to VSCode.
Click the
Run and Debugbutton on the left toolbar.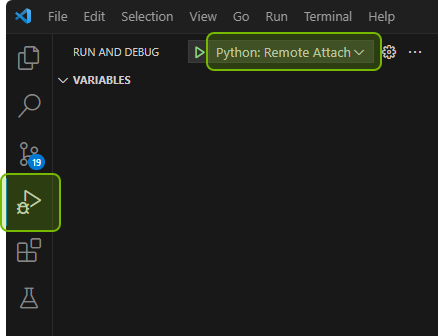
Select the
Python: Remote Attachoption - as named in the abovelaunch.json:"name": "Python: Remote Attach".Now click the button to run in debug mode:

Return to the
my_company.usd_explorerapp and note that the debugger is attached:
Open
".\my_company.usd_explorer.tutorial\my_company\usd_explorer\tutorial\python_ext.pyand set a breakpoint inside theon_click()method.Bring up the
My Company Windowin the app and click on theAddbutton. The breakpoint in VS Code should be triggered at this point. Observe that the Python file in VSCode is the file in the_builddirectory: you set the breakpoint on the source file and the breakpoint triggers within the build files.
Be sure to remove the omni.kit.debug.vscode dependency from the app when you are done debugging.
Test
Now that we know the Extensions works we want to keep it that way. Kit SDK provides a framework for running tests that assert functionalities as Applications and Extensions are improved with more and more functionality.
The my_company.usd_explorer.tutorial’s extension.toml file has a section where additional dependencies can be
added for when tests run.
[[test]]
# Extra dependencies only to be used during test run
dependencies = [
    "omni.kit.ui_test" # UI testing Extension
]
The omni.kit.test
Extension which provides the foundation for running tests does not need to be added as a dependency because it is
added to the executables by the build process. We added omni.kit.ui_test
because it enables using the UI in tests.
The Extension’s test_window.py module contains the tests:
It imports modules from within the Extension.
Function
test_hello_public_functionis an example of asserting a method on a module.Function
test_window_buttonis an example of including UI elements in a test. Buttons are found by their UI path and then button clicks are simulated.
Run Test
The .\_build\windows-x86_64\release directory contains a number of bat files for testing Extensions and Applications.
To run the test of this specific Extension run the tests-my_company.usd_explorer.tutorial.bat file inside of a
command line to see the output.
Adjust the Test
Note that the test fails because it can’t find the UI elements. That’s because we changed the UI behavior:
the My Company Window window does not open automatically. We need to simulate a user opening the window in order
for the UI elements to be found:
Edit the extension.toml’s [[test]] section by adding omni.app.setup as a dependency. This allows the menu to
appear just like it would when the Extension is part of an Application.
[[test]]
# Extra dependencies only to be used during test run
dependencies = [
   "omni.app.setup",
   "omni.kit.ui_test" # UI testing Extension
]
Also in the [[test]] section, comment out the "--no-window" line. This will allow you to see the UI when running the test.
args = [
    "--/app/window/dpiScaleOverride=1.0",
    "--/app/window/scaleToMonitor=false",
    # "--no-window"
]
In test_window.py, add await ui_test.menu_click("Window/My Company Window") at the beginning of the
test_window_button method. This simulates a user showing the window.
async def test_window_button(self):
   # Simulate user clicking menuitem to show window
   await ui_test.menu_click("Window/My Company Window")
Continue adjusting test_window.py by changing the UI paths starting with My Window/: set to My Company Window/ instead.
# Find a label in our window
label = ui_test.find("My Company Window//Frame/**/Label[*]")

# Find buttons in our window
add_button = ui_test.find("My Company Window//Frame/**/Button[*].text=='Add'")
reset_button = ui_test.find("My Company Window//Frame/**/Button[*].text=='Reset'")
Run the test again. Notice how the menu is clicked - and the test is successful again.
As additional functionality is added to the Extension, more tests can be added to make sure manual QA can be kept to a minimum.
Test coverage can be reported as part of running the test by passing the --coverage argument to the executable:
tests-my_company.usd_explorer.tutorial.bat --coverage. Note that --coverage should only be used for individual Extensions - not Applications.
Read more here about code coverage.
Note
Reference: omni.kit.test
Reference: omni.kit.ui_test
Reference: Python Test
Reference: C++ Test
Develop for Omniverse Cloud
If you are not familiar with Omniverse Cloud then you can read more here and revisit this section in the future.
In the above steps you worked with the omni.usd_explorer.kit file as a starting point.
You may have noticed the neighboring omni.usd_explorer.ovc.kit file.
The latter is a file to use when you plan for an app to run on Omniverse Cloud (OVC).
Applications streamed from OVC are very similar to Applications that run on workstations. There are some small but necessary differences in settings mostly.
Observe that omni.usd_explorer is a dependency inside omni.usd_explorer.ovc.kit. The “ovc” app is
composed with the “base”:
[dependencies]
# the base App
"omni.usd_explorer" = {}
If you wanted to develop a my_company.usd_explorer app for OVC you would:
Duplicate the
omni.usd_explorer.ovc.kitand name itmy_company.usd_explorer.ovc.kit.In
my_company.usd_explorer.ovc.kit, change the dependency"omni.usd_explorer" = {}to"my_company.usd_explorer" = {}.Change the
[settings.app.extensions]section to:
[settings.app.extensions]
generateVersionLockExclude = ["my_company.usd_explorer"]
Add
define_app("my_company.usd_explorer.ovc")in.\premake5.lua.
The developer workflow for creating an OVC app:
Continue developing for the workstation. At the very least, you as a developer still need the ability to run the app locally to test functionality.
Do most changes to dependencies and settings in the “base” kit file. Only make changes in the “ovc” kit file when the change is only relevant to running the app on OVC.
The changes you make in the “base” kit file are automatically picked up by the “ovc” app.
When you package the app, use fat packaging for OVC publishing. You can package both apps in a single package.
Summary
Hopefully this tutorial has been beneficial thus far. We’ve covered everything from creating apps, how to configure dependencies and settings, how to debug and test code. At this point it’s all about iterating on functionality; however, let’s assume that has already been completed. Let’s fast-forward and imagine we want to give the app to end users. Please continue reading through the Package App and Publish App sections to learn how to do just that.